|
| |


This page is still under construction and new text and pictures will be
forthcoming.
Most of the airplanes that I have built in the last 28 years have been
painted with Dope and/or acrylic lacquer. Film covering has its advantages
but there is nothing any prettier in my opinion than a hand rubbed dope finish. This page will
outline the procedures and materials that I have used in the past along with
methods that other people have used.
The chart below doesn't cover
all of the possibilities of compatibility but is a start. The only sure way
to make sure that your products are compatible is to test them on a scrap
part. One that isn't listed on the
chart is Nitrate and Butyrate dope. Butyrate will go over Nitrate but
Nitrate will not go over Butyrate. I have been told that Nitrate is not
fuel proof but have never tested this.
Film Coverings The major drawback with film coverings (Ultracoat,
Monokote etc.) is the tendency to wrinkle when the wood underneath swells or
shrinks with humidity and the covering to eventually lift at the seams or edges
when exposed to fuel. Goldberg Ultracoat is less prone to this than Monokote in
my opinion although the availability of more colors becoming available have given the builder more
leeway in designing an attractive covering scheme.
The film coverings definitely have an advantage where time is a factor.
They afford a good looking model with minimal effort. Nathan Carter and
Bill Pence come to mind when it comes to a beautiful film covering job.
It is my intention to solicit their articles on film coverings for this web page
in the future.
Sand, Sand And Sand Some More. Probably the one skill that is most lacking in modeling is how
to use sandpaper. The paint job starts with sanding the structure of the
airplane and ends with sanding the clear coat before buffing with compound which
by the way is liquid sandpaper. It is imposable to get a good paint job on a
structure that has gaps in the wood or seams that have not been block sanded
properly. If the structure is tight and smooth less filler is used and a
lighter paint job will result. Wavy trailing edges and rippled sheeting
will stand out when a glossy paint job is applied. If you are
willing to devote some time you will be rewarded with a great looking
airplane. Another thing to remember is the skills to paint a show plane
will not be developed on one or two airplanes but many. Also applying a
light weight painted finish that is shinny takes some practice and skills with
sandpaper.
I prefer to use sanding bars that are the length of the part that is being
sanded such as leading and trailing edges. Square 1" tubes that have
sandpaper of different grits such as 100 and 200 applied to opposing sides work
well.
Once the airframe is sanded and you are happy with the outline now is the
time to knock down all of the sharp edges. Even though the plane is
straight and the seams are tight, the corners of the ribs, stringers and
sheeting around the open rib bays need to be rounded to keep them from cutting
through the covering. If the sharp corners are left around these areas the
sandpaper will inevitably cut through these areas when sanding the paint or
filler coat. I have used 600 to 1000 grit sandpaper for this and they both seem
to work well. The finer the grit the less chance you have of sanding away
too much material. Now is a good time to sand the sheeting with 600 or
1000 grit sandpaper to remove the fuzz. If painting a fiber glass
airplane or part I use 320 grit to remove the gloss of the fiberglass before
priming with automotive lacquer primer. If priming small parts like
cowlings or wheel pants the automotive primers in a spray can work well.
Fillers And Putties Try to keep the airframe tight to keep the
fillers to a minimum. If filling the bare wood and the gap is not to large
microballoon putties work well and are light. These putties are not strong
enough in my opinion for fillets. Auto body acrylic lacquer putties work
well for small imperfections but are heavy. These putties blend to a fine
feather edge easily and dry rapidly. The acrylic lacquer putties from 3M
come in Red Green and Blue colors. The drying times vary from slow to
fast. I have used mostly the blue and green. Since these putties are
a lacquer base they adhere to the dope finish in case you need to fix a ding
when the plane already has paint on it. I have never used the Bondo fillers
since I feel they are too heavy for model airplanes.
I have always applied the fillets after the plane is covered and primed so as
to keep the paint buildup to a minimum. where the fillet is to go keep the
paint buildup thin. I have had trouble in the past
with too much primer and or dope building up on the fillets and causing the
paint over the fillet to bubble or lift. Only one coat of primer or dope filler
is applied to the top of the fillet before painting. For fillets of 1/8
inch or more I use a blend of epoxy and microballoons. Z-Poxy or Smooth
and Easy seem to work well for this purpose. Add enough microballoons to
give the mix a thick consistency that appears to be dry. Apply the
Micro mix with a radiused tool made out of 1/16 plywood. If the micro mix
has to be smoothed slightly you can wet your finger with Isopropyl rubbing alcohol.
Once the fillet is cured it is sanded with 200 to 320 grit wrapped around a
radiused tool to achieve a uniform shape. Sanding the fillet also exposes
the microballoons and allows the paint to get a better grip for adhesion.
Applying The Covering (Silkspan, Japanese Tissue, Sig Koverall,
Polyspan) I have always applied one coat of Sig Nitrate dope unthinned to
the bare wood sanding after each coat with 600. The reason for using Sig
Nitrate is to seal the wood and create a base that the covering will adhere
to. When using polyester coverings it is mandatory for proper adhesion of
the covering unless you are using Sig Stix-it to adhere the covering to the
framework. The first coat of dope on the polyester covering is always
Nitrate followed by Butyrate. Butyrate can be applied over Nitrate but
Nitrate will not go over Butyrate. Another advantage of Nitrate is the
thick glue like characteristics. This comes in handy when trying to seal
the fuzzy edges of Koverall before sanding and blending. Covering an open framework is mandatory for obvious reasons but
what about those sheeted foam wings and wood fuselages? To get a good
finish or a grain free finish covering will have to be applied over the bare
wood to keep the grain from showing through. The type of covering is
dependant on the type and size of the airplane. Sheeted scale planes will
benefit from silkspan covering to keep the grain from showing through. Silkspan
is a good choice for those small R/C planes and comes in three different
weights. K&S silkspan is the most user friendly brand out there since
it sands better than other brands. For further information on covering
with silkspan by Jim Ryan click
here
Large R/C airplanes such as Piper Cubs will benefit from the strength of Sig
Koverall and appear scale due to the desired fabric weave showing through the
paint. Polyspan which is a no woven polyester similar in appearance to
silkspan is stronger than silkspan and is a good choice for those intermediate
sized R/C projects. Polyspan has the advantage of not being affected by
humidity like silkspan and is puncture resistant. The polyester coverings
are applied somewhat taught over the airframe and are shrunk with heat.
Sig Koverall will shrink tight enough to warp a light airframe so caution should
be taken. Polyspan has a more moderate shrink rate.
Japanese Tissue has been used extensively by the free
flight modelers and was not used by R/C modelers until the indoor radio control
models came along. There are products out there that are about the same thickness
as Japanese Tissue but are Polyester. These covering materials have the color
already added to the tissue. I do not have any experience with these
Polyester tissues at this time but have a few small R/C projects that will
require them.
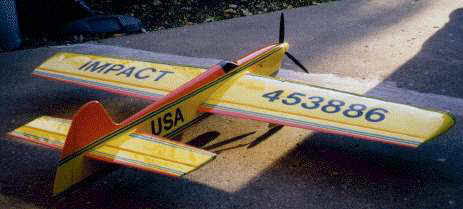
Below are a few articles concerning the Polyspan
covering material. I believe that Polyspan is the ideal covering for mid
size R/C airplanes that are going to be painted. Picture of Steve Starr's
Impact covered with Polyspan and painted with Sig Dope. Steve was able to
achieve a high gloss by wet sanding the clearcoat with 2000 grit sandpaper and
buffing with polishing compound.

POLYSPAN
Excerpts from Larry Davidson's article for Sam Speaks
"I can tell you that this is a great
covering material..."
|
After seeing several ads for Polyspan,
I decided to order a roll and try it out. I also ordered some of the
analine dye that Sal Fruciano (owner of Starline) sells. So far, I only
used the Polyspan on a 1/2a Country Boy free flight and the results are
as follows:
The first thing to know is that this
is a polyester material and impervious to water so don't try to shrink
it with water. The Nitrate dope will shrink if fine and any
wrinkles left can be taken out with a MonoKote iron.
I started on the stab first and
proceeded to follow the brief instructions which came with the product.
He recommends pre-doping the frame outlines in the usual method used for
Japanese tissue or silkspan which is two coats of Nitrate Dope. I
then cut out the Polyspan 1" larger than the outline of the stab
and doped it with Nitrate Dope thinned 50% through the material.
So far everything went well and the material went on easier than
Japanese tissue. Naturally you try to put it on by getting it reasonably
wrinkle-free. Then I cut the material flush with the framework with a NEW
double edge razor blade. So far so good. I then applied the Polyspan on
the top in the same manner and trimmed it leaving the usual 1/8"
for overlapping. Then came the problem. The material does not want to be
rolled over the edges in the usual doping down method. It kept trying to
straighten out the overlap and no matter how hard I tried, it would not
roll over.
I called Sal Fruciano and asked him
for a remedy to the problem and he said that using a Monokote iron to
crease the material should help. Well, he was right and the following
was the method which worked great for me.
Before putting the dope on the edges
to be rolled over, I used the Monokote iron and creased the edge as Sal
suggested. Then I put the Nitrate Dope under the overlap and
rolled it over with my fingers in the usual fashion. It will still try
to come up and by running my fingers around the edges until the dope is almost
dry to the touch, I then took the MonoKote iron set at about 325
degrees and rolled over the edges to stutter when I use the
"M" word. That is because as many know I am a religious silk
and dope man.
The next step was to brush some of the
analine dyed Nitrate Dope on the bottom of the stab. It was
difficult for me to believe that you could get the wrinkles out and make
the covering tight with just putting the dope on. Well I can tell you
that it tightened up great but I did not like the way the color came out
on the bottom or the top. It was streaky and I did use a foam brush.
Then I noticed that the top looked like the Chia-Pet that is advertised
on television as it seemed to sprout fuzz and hair on the top. I
wondered why this did not happen on the bottom and finally realized: IMPORTANT:
There is an inside and outside to the covering. There is one side to the
covering that is more glossy than the other and you MUST
put the glossy side on the outside. On the roll that I used, the glossy
side was on the inside of the roll and when placing a cut piece on the
bench it would try to curl the edges up with the glossy side facing up.
I removed the top covering from the
stab and put another piece on with the glossy side up. As I said before,
I was not satisfied with the orange tinted dope finish which I had
brushed in my usual fashion with a foam brush as it looked streaky and
mottled. The answer was to spray the dyed dope on. This would not be
necessary if you left the material white, which is the only way it is
available. Don Reid, after seeing my Country Boy at the GGG decided to
try Polyspan and then called me to say he had recovered his house
including his wife, Cynthia. Obviously he was impressed with the
Polyspan.
One of the members of our SAM 75
chapter, John Sullivan asked me for a piece of the Polyspan so he could
experiment with the dying process and at our next meeting, he had
produced the following results:
He felt the best way to dye the
material was to use a powdered analine dye. You also may buy the liquid
dye 10 parts of nitrate dope to 1 part of dye, however I found that with
the orange dye, a 20 to 1 ratio worked great.
John says to mix a 2 oz jar of the
powdered dye with one quart of methyl alcohol (methanol) and spray it on
the material before covering the model, otherwise the dye will also
color the rest of the wood of the frame work. You can also use the dye,
both powder and liquid in nitrate thinner and spray this on Polyspan
before covering the plane. If you use the powdered dye, be sure to use
cheese cloth to filter the dyed thinner after mixing it thoroughly.
Because this plane had to be fuel
proof as I use 40% nitro fuel in my Cox TD .049/.051, I continued with
my customary finishing technique of spraying K&B Super Poxy over the
two coats of nitrate dope. The fuselage came out fine, but the wing was
a disaster. The Super Poxy would not fill the pores I the Polyspan on
the bottom. I decided to spray one coat of butyrate dope on the top of
the wing to fuel proof it. I assume that if I applied several more coats
of the nitrate dope to really seal the Polyspan, the Super Poxy would
have worked well.
I can tell you that this is a great
covering material and I expect that on the next plane I use it on will
work well with the techniques I learned on this plane. It really gives
tremendous strength to the framework, probably as much as silk does and
it surely is a great improvement in strength and puncture resistance
over Japanese tissue and silkspan even though it is a little heavier.
POLYSPAN
by Don Typond
(Reprinted from Flying Models, December 1994)
Wouldn't it be nice
if there were a covering material that's strong and stable and just
about puncture-proof, and not any heavier that what's being used now?
|
Polyspan, a modern covering
for traditionalists. Looking very much like the more transparent
silkspan of 30-plus years ago. Polyspan is made of non-woven
polyester fibers randomly intertwined, but with a definite grain
running lengthwise along the sheet. It isn't as stiff as
silkspan or tissue, but rather feels "floppier" and is
soft and silky to the touch. Like silkspan and tissue, Polyspan
is porous, and needs to be filled with dope. It's perhaps best
described as a "paper" made with polyester fibers
instead of wood fibers. But unlike paper, Polyspan is waterproof
and doesn't absorb moisture. Which means it won't sag and change
the airplane's trim on those dewy early morning flights or rainy
day flying sessions.
And it is tough! Trying to
tear it across the grain takes more force than you'll ever put
on a model in normal use. It does tear more easily with the
grain, but is still much stronger than silkspan, and probably
even stronger than silk. Let's put it this way; if you dropped a
quarter on it from two fee up, it'd bounce off. Yes, sharp
objects will puncture it, but the polyester fibers will resist
the puncture growing into a tear.
Polyspan is made in Germany,
and imported by Sal Fruciano. A roll measures 12 feet by 20
inches, and sells for $15.00. Polyspan is available only in
white, but can be colored by mixing dye into clear dope and
spraying it on. (The old method of dyeing in colored water
before covering doesn't work because Polyspan is waterproof.)
Starline by FAI Model Supply sells 2 oz. concentrate dyes in
red, yellow, blue, orange and black, at $5.50 per-ounce bottle,
which will dye a lot of dope at the recommended one-to-ten
ratio. Polyspan can also be painted with opaque dope, of course,
or with other compatible paints once it's been sealed with a few
coats of nitrate dope.
Okay, how heavy is it? I
weighed one-square-foot samples on my balance scale (which I'm
sure is accurate, but even if not produces usable relative
weight comparisons). Polyspan weighs 2.25 grams per square foot,
Japanese tissue ("Esaki" white, from Oldtimer Model
Supply) weighs 1.125 grams per square foot. Thus, Polyspan is
twice the weight of silkspan, and slightly more than twice the
weight of Japanese tissue.
But raw weight doesn't mean
much since these coverings require dope to seal them, and
Polyspan is said to need only two coats of 50-50 thinned nitrate
to fill it. So I made a 12 x 12-inch balsa frame, and doped the
Polyspan to it. Then I thinned Sig nitrate clear dope 50-50 by
volume could result in a more full-bodied material, requiring
fewer coats.) Two coats began to produce a gloss, and filled
most of the grain, but there were still a few small pinholes
that could be seen when I held the panel up to the light. It
took five coats to completely fill all the pinholes, and by then
the surface had become attractively glossy. Obviously, applying
many coats to the entire surface just in order to fill the
pinholes is overkill, and were I covering a glider or
rubber-powered model I would consider two or three coats
sufficient (maybe dabbing a little more on the pinholes),
especially since the dope isn't needed to make the covering
moisture proof.
I then removed the Polyspan
from the frame and replaced it with a sheet of silkspan.
Painting silkspan is like painting a blotter, and the first
couple of costs used a lot of dope as it soaked in. By the time
the silkspan was sealed and the surface no longer fuzzy, I had
applied six coats.
Lastly, I repeated the
procedure with a panel of tissue, which required three coats to
fully seal it.
After allowing 48 hours drying
time, I weighed each panel. The Polyspan weighed 3.6 grams, the
silkspan also weighed 3.6 grams, and the tissue weighed 1.8
grams. In short, Polyspan ends up having the same finished
weight as silkspan, but with much more strength, moisture
resistance, and longevity. Yes, it's twice the weight of
Japanese tissue, which is still my choice for small, light
rubber models, but Polyspan is perfect for larger, heavier
freeflight, control line, and R/C models.
|
|
© STARLINE
BY FAI MODEL SUPPLY
PO BOX 366
SAYRE, PA 18840
PHONE (570) 882-9873
FAX 888-882-9873
Covering and Painting Weights
Here's a table of, purported, covering weights originated by Fritz Bien,
Charles River Radio Controllers, December 1996, with other contributors (August
1995 Flying Models article, Herm Perez, adding covering data, and Radio
Control Soaring Exchange [RCSE] articles):
Covering Weights Chart
| Covering |
Color |
Weight [gm/sq ft] |
Comments |
| Monokote |
Red |
5.8 |
circa 1996 |
| Monokote |
Yellow |
7.5 |
circa 1996 |
| Monokote |
Metallic Platinum |
6.0 |
circa 1996 |
| Monokote |
Red |
7.1 |
circa 1971 |
| Monokote |
Black |
6.0 |
circa 1985 |
| Monokote |
White |
7.3 |
circa 1990 |
| Monokote |
Transparent Red |
5.5 |
circa 1988 |
| Monokote |
Orange Florescent |
9.4 |
circa 1996 |
| Ultracote |
Dark Red |
8.5 |
circa 1996 |
| Ultracote |
Cub Yellow |
6.6 |
0.002 in thick |
| Ultracote Plus |
Pearl Yellow |
8.2 |
0.0022 in thick |
| Ultracote |
Transparent Yellow |
5.0 |
0.0015 in thick |
| Ultracote |
Transparent Yellow (lite) |
3.4 |
0.001 in thick |
| Century 21 Fabric |
White |
10.4 |
Heavy! |
| MicaFilm |
Yellow & Red |
4.0 |
Needs Balsarite |
| MicaFilm |
Preprimed |
3.9 |
|
| MicaFilm |
Transparent White |
2.2 |
Needs Balsarite |
| Sig Koverall |
White |
4.3 |
Needs dope or paint |
| Sig Supercote |
Silver |
4.8 |
|
| Esaki Light Silk |
Clear |
0.97 |
REALLY Hard to put on |
| 5/8 fiberglass/paint |
clear |
3.9 |
Needs filler and color |
| Japanese Tissue |
all colors |
0.65 |
The lightest! |
| Nitrate Dope |
clear |
1.0 |
2 coats/ 50-50 thin |
| Dope, gloss finish |
all colors |
7.0 |
8 clear, 4 color, 1 clear coats |
| Dope, over silk |
all colors |
2.0 |
|
| Polyester Dress Lining |
All colors |
4.2 |
Needs Balsarite & dope |
|
Paint Scheme Design There
are almost as many paint schemes out there as there are airplanes so this is a
very broad subject. There are some rules to follow in designing a good
paint scheme but it comes down to what ever the modeler decides. If every
plane looked alike it would become pretty boring. Can anyone say ARF?
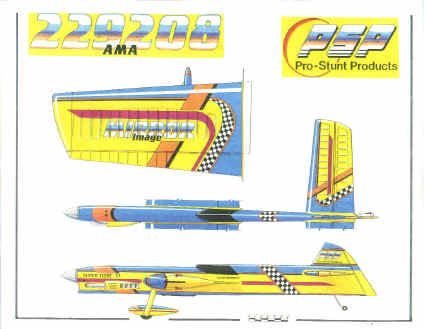
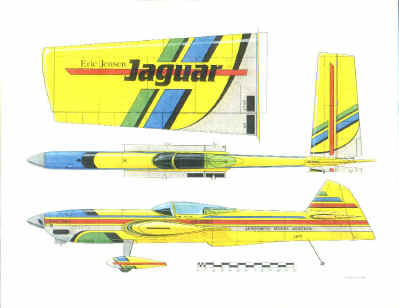
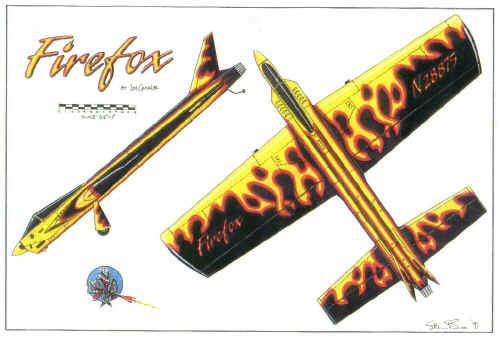
I have included a few of Steve
Buso's paint schemes that he designed for control line aerobatic
models. The schemes shown below will hopefully inspire you do design
your own or borrow some of the things you like and adapt them to your plane.
|
 |
This
scheme was designed for Dave Midgley by Steve Buso. The Cardinal airplane
shown here was designed by Windy Urtnowski. So if you are looking for this
airplane look for the Cardinal. Brodak kitted this airplane as a profile.
|
|
Steve
was the one who designed the ZAP Machine scheme that was extensively used for
the Lanier Stinger airplane. The airplane shown here is Steve's design
that he flew in the Nationals in the late 1980's I believe.
|
 |
|
This
was another one of Steve's designs the Jaguar. The scheme was done for
Eric Jensen. |
| This flame job is an eye
catcher. The plane was designed by Jim Casale and the paint scheme was
Steve Buso's |
 |
|
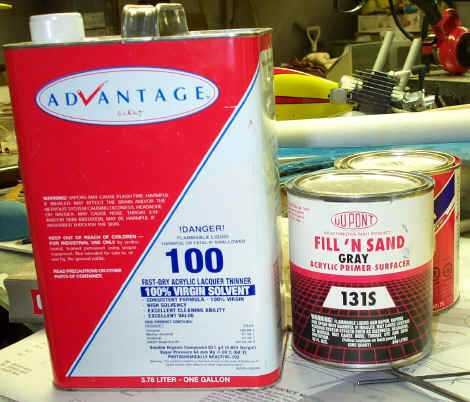
The Filler Stage
The
can of Advantage 100 thinner is for cleaning the gun or thinning the Dupont Fill
N Sand to the right viscosity for spraying. The Fill N Sand primer is a fast
filling primer that needs to be thinned 100% to 150% before spraying. The
Advantage 100 thinner is an off brand that was purchased at NAPA Automotive
supplier. The Dupont Fill N Sand is no longer available around the Indianapolis
area due to the phase out of Lacquers but there is a comparable Advantage
product that I have used with the same results.
The Fill N Sand prime works well
over silkspan covering , Sig Koverall or Polyspan. Fill N Sand
can be brushed on the airplane with satisfactory results if the area is not too
large whereas an automotive spray gun will help speed up the process if the
plane is large like the 1/3 Spacewalker . Nitrate dope is the dope of
choice for the first coats against polyester coverings such as Polyspan and
Koverall. The primer can be sanded in about four hours after spraying if the
temperature is around 75 deg F. I sand the first coat of primer with 320
grit paper and subsequent coats with 400 grit. Usually only two coats of
primer are needed. Sanding through certain areas such as rib cap strips is easily fixed by brushing on
the thinned primer. It is important to sand most of the primer away
leaving only the low spots on the first coat. Sometimes it helps to thin the
primer about 150% on the second coat. Thinning the primer over the recommended
amount will cause it to become too powdery with very little hold out.
Primer can be made by mixing one
part dope, one part talc and one part thinner. Fiber Glast in Dayton Ohio
sells talc that is unscented and works well for this purpose. Once the
talc and dope is applied and sanded then a coat of clear will help seal the surface
for better holdout of the subsequent color coats. If you really want to
see flaws in the primer or filler coat spray on a coat of silver and watch those
imperfections pop out. Another technique that is great for finding flaws
on a painted surface is to candle the surface. Candling is when you let
the light bounce off of the surface at a low angle so that it creates a shadow
where there are low or rough spots. It helps if there is only one light so
the others do not wash out the low spots.
 |
|
|
Spraying Color And Trim
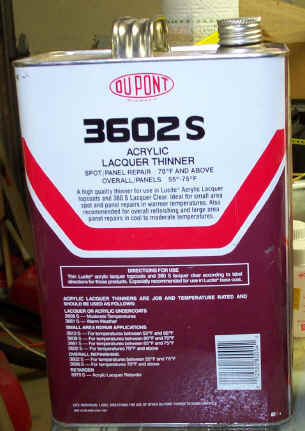 This has been my
thinner of choice for thinning color and clear Sig dope. It dries relatively
fast but not so fast that the Sig dope blushes. I have had good luck thinning
the Sig dope about 50-50 or 60 dope and 40 thinner depending on the color and
coverage. This has been my
thinner of choice for thinning color and clear Sig dope. It dries relatively
fast but not so fast that the Sig dope blushes. I have had good luck thinning
the Sig dope about 50-50 or 60 dope and 40 thinner depending on the color and
coverage.
Since Du Pont is getting out of the lacquer business
Sig thinner with Randolph retarder added to control drying time and blush
control is an option. Our local NAPA store carries Advantage brand
thinners with varied drying rates that work well. I have always tried to
limit my dope spraying on days with 60% humidity or less. If the humidity
is greater than this then the dope tends to blush. Blush is created when
the paint dries faster than the moisture can escape from the paint. Subsequent
coats of paint applied when the humidity is lower will allow the blush to escape
so have patience and come back later and recoat. It is also beneficial to have
the plane warmer than the ambient air to keep the moisture from condensing on it
when spraying in cooler temperatures. Everyone knows what happens when
they pull a cold drink out of the fridge in the summer (it sweats) and your
plane will do the same. Retarder can be added to the paint but adding too much
retarder will allow the fresh sprayed coats to soften the underlying coats too
much. Cool days in the 50 F to 60 F are good for spraying dope since it
dries slower helping the flow out some.
|
| Masking
Masking an airplane is about 90% of the work in
painting an airplane with more than one color. When someone says
nice paint job what they should be saying is nice masking job. I
have spent hours masking for one color when it only took ten minutes to
spray the color.
When masking out a paint scheme templates made from
see-temp or poster board to guide the tape application come in handy to
assure that the design is symmetrical on each wing.
Some modelers have used masking tape but only after cutting
the edge of the tape with a sharp #11 blade to true it up. I have
always used 3M fine line tape available at automotive stores and have
never had to apply clear dope to seal the edges from paint creeping under
the tape. They don't seal the edges of tape in the automotive paint
world so why should we have to. If you are using trimmed masking
tape you might have to apply clear to the edge of the tape so sticking
with 3M is the way to go in my opinion. When using Friskit film for
a mask I do not seal the edges. |
|

A few of the items that I use while masking off the trim
colors. The Paasche double action air brush took a little getting use to
but with the right tip it works extremely well with dopes.
|
|
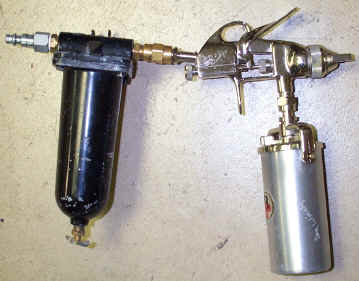
The trusty old cheap Buffalo gun is what I use to spray
the primer, color and clear coats. It would help if I had two of
these guns where I could keep one for clear only. If using the gun for
color, primer and clear make sure that you run adequate thinner through it
to keep it clean. Nothing worse than having a red glob of paint come
out of the gun while spraying clear over white. The cylinder behind the
gun is a filter and dryer. The filter dryer can be mounted anywhere
between the compressor tank and the gun but I preferred to mount mine to
the gun. The gun can get a little heavy at times but I am assured of clean
dry air.
|
| Clearcoat And Buff
If you are looking for a show stopping finish then
this is the only way to go. No matter how shinny the paint comes out
of the gun to get that plate glass look you will need to sand the clear
coat and buff with polishing compound. Acrylic Lacquers and airplane
dope shine as well as any two part paints once you have sanded and buffed
them. Two part paints such as acrylic enamels and epoxies are harder
to wet sand and buff to a nice shine but it can be done. I have
sanded and buffed Imron clear coat two days after spraying but dope paint
should be allowed to cure for about two weeks minimum.
3M makes a variety of grits for sanding the color
and clear coats starting with 600 grit and going up to 2000 or above (I
have only used up to 2000 grit). I start with the 600 grit wet until
the top shine is broken and there are still some low spots at the bottom
of the orange peel which show up as shinny. 1000 grit is used next
to get a uniform dullness followed with 1500 and finally 2000. I
have an atomizer that I fill with water and one or two drops of dish
washing liquid such as Dawn to help the paper cut better. Frequently wipe
the water and paint sludge away to see that you are not sanding too
deep. A good thick coat of clear is a must for good sanding and
buffing. I used a little over 1/2 gallon of Sig clear plus thinner
on my 1/3 scale Spacewalker (five quarts total mix).
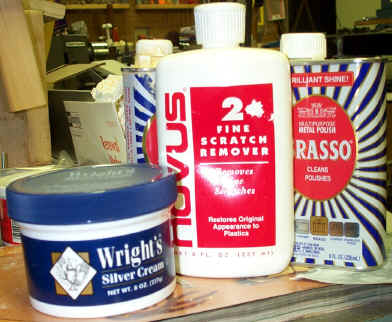
For buffing compound I have found that Brasso works
well. Brasso seems to have the right viscosity and gives a nice
shine to dope. Brasso can be followed with silver or plastic polish
if you want an even deeper shine. Turtle Wax and McGuire's products
also work well. I have used Turtle wax white polishing compound with
good results but my favorite up until now has been Brasso for the initial
shine followed with Novus polish. There are different brands of silver
polish and they all seem to work well for that final super wet look shine.
|
|
|
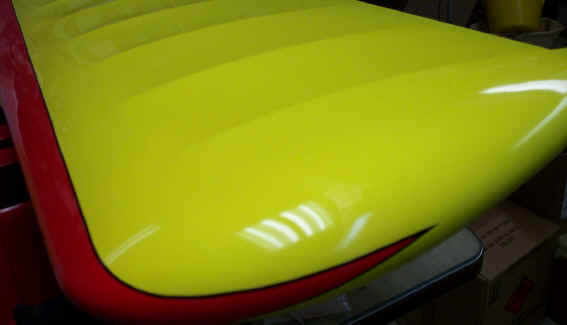
Here is a shot of the Spacewalker wing tip after sanding and buffing
with the compounds shown above. The Koverall was extended around the
fiberglass wing tip so everything blends together. The 1/16 inch black
striping tape is a 3M automotive product sold at car shops and was applied
before the clear was sprayed. Although not visible in the picture there is
a little weave pattern under the gloss that will come out more as the
paint cures. Usually a few hot days in the sun is all it takes to get the
weave to come out. I have finished a few parts of airplanes with
fiber glass such as nose sections and the glass will always show through
the primer or filler coats eventually. If you are finishing Sig
Koverall or Stitts Lite covering do not be afraid to fill the weave and
buff since it will inevitable show through anyway. |
|